Brick matching 101

Words: Don FosterWhen repairing or adding to a masonry structure, we usually want the new area, wall, extension or wing to look just like the pre-existing masonry.

Matching colors and textures is one way to make any set of structures appear to “belong together.” A house and a garage, a church and a rectory, or a set of buildings on a university campus give visual evidence of their relationship, when they obviously are made of the same materials in the same color. When two or more buildings have the same natural-looking masonry façade, they appear particularly substantial and unified.

This unity is destroyed when a repair is made, or a new wall, wing or building is added using masonry that does not match. Sometimes a customer on a budget may reluctantly accept a small mismatched repair that scars the structure and reduces the value of the property. But for large projects like a new wing for the hospital or a new science building on campus, the customer should never feel the need to build or expand without masonry because the new brick would not match the old. To get the job done right, you will need to know how to match brick.

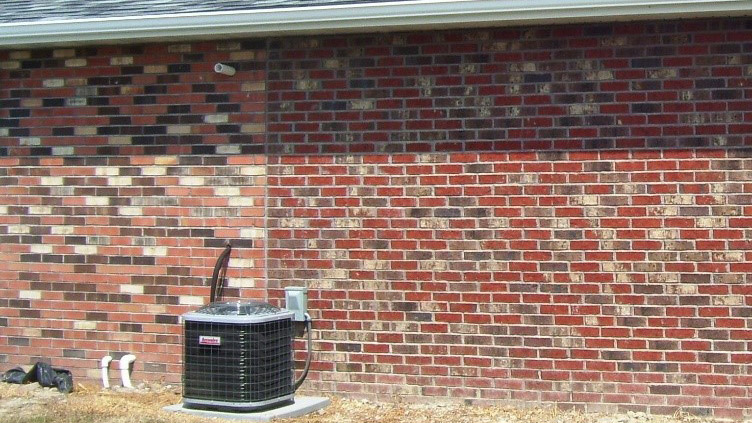
Shown is a result of poor planning. The wrong colors and textures were chosen.

Rule No. 1: Find the brick

Begin your search as early as possible. The earlier you start, the more options you’ll have, and the greater your chances of achieving the best result.

Find out whether the original brick still are being made today, and, if so, whether they are still made at the same plant. From time to time, a brick manufacturer will stop making a popular type of brick (perhaps because of a plant closing), and then try to keep sales up by making that brick at another facility and giving it the same name. Unfortunately, the change in facilities means that the raw materials, machinery and manufacturing processes also may change. As a result, the new brick may not look like the old, and may make a poor match for a project.

Even a brick made at the same facility and given the same name may look different. Brick manufacturing involves many variables, any one of which can change the color or texture of the finished product. Beware of relatively small differences that may become noticeable, once the wall is built.

Keep all this in mind when trying to find the right brick for a project. The best way to know whether your tentative choice is a good match is to get a current sample that represents the complete range of color, size and texture. If possible, build a 40- to 100-brick panel, laid in mortar, so the proper percentages of the various colors of the brick range will be represented.

Compare the panel to the wall you are trying to match. Keep in mind that the mortar color also needs to match as it can represent a significant portion of the wall (e.g., 18 percent to 20 percent of a modular-sized brick wall), and will have a sizeable effect on the apparent color of the brick.

Rule No. 2: Blend two or more types of brick to match the range of the original wall

Sometimes a single type of brick will not give you the full range of colors needed to match the original wall. In this situation, try blending two or more types of brick that work together to give you the range you need.

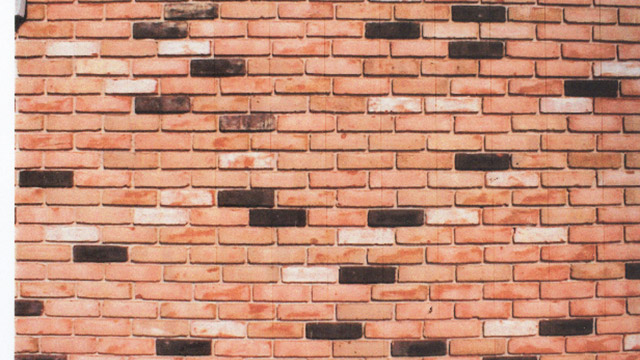
This is a perfect example of a blend that would be difficult for a manufacturer to repeat.
Creating a blend like this requires careful thought. In addition to matching the colors and the proportions of colors in the original wall, you must assure that your new set of brick types will all work together. Check the face height, length and bed depth, and the technical standards for each (e.g., ASTM C-216 FBS, FBX or FBA).

When searching, your first choice should be to find a complete set of brick of all types needed that can be made by a single manufacturer at a single plant. Your second choice should be a set made by a single manufacturer at more than one of its plants. If still unsuccessful, your last choice should be to blend brick made by more than one manufacturer. When working with more than one manufacturer, coordination and logistics will be complicated. One approach is to ask if your brick distributor would be willing to blend the brick on pallets at his location before delivering to the project.

Matching sizes is essential for an attractive blend. The mason has a difficult job laying brick when the face heights and lengths of the brick are not compatible. The new wall can look irregular and sloppy, and at times will not line up to the existing wall.

Color also is essential and must be right in three ways.
  • First, each color that is a part of the blend must be right. For example, if you have a four-way color blend, and three colors match but the fourth does not, you will find that you will still have a poor match that will be obvious even to a casual observer. The wrong color, even in a brick that makes up as little as 20 percent of the overall blend, can create a noticeable difference.
  • Second, each color must make up the right percentage of the wall. If the original wall consisted of 40 percent dark red, 30 percent light red, 20 percent orange and 10 percent brown, then the new wall must include those same percentages of each color.
  • Third, the colors must be arranged so as to mirror the way they are spaced and placed in the original wall. If the orange bricks in the original wall never touch each other, but the orange bricks in the new wall are often clumped together in groups, the mismatch will be obvious.
The goal is to mirror the original wall in every possible way. The work requires careful attention to detail, but the results are well worth the effort.

Rule No. 3: Stain when needed to improve the match

When stain can help

Although beginning early and conducting a thorough search will greatly increase your chances of finding a brick match, sometimes the brick is simply unavailable. At other times, you may decide that complex blending is impractical for a particular job. When that happens, look for brick that are the same size and texture, and as close as possible to the original wall in color. The closer you get in color, the less staining you’ll have to do. Less staining means lower costs and a simplified color-matching process for a better chance of a more precise match.

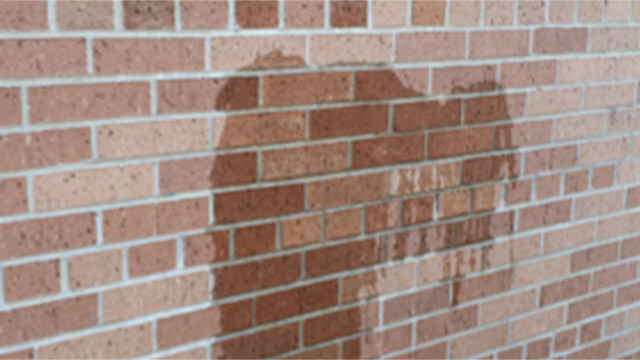
These bricks absorb water and darken. They are good candidates for stain.
Also assure that the brick are good candidates for staining. All you have to do is assure that the surface is absorbent. A simple water test is all that is needed. Pour some water on the wall. If it absorbs some of the water and darkens temporarily, as illustrated, then you can incorporate proven masonry staining into your planning, adding a stain contractor to your team.

Using a proven masonry stain system has many advantages. One is that the product will never hurt the brick or masonry to which it is applied. Another is that it is applied artistically with a brush, one brick at a time, to maximize absorption into the masonry face.

Still another advantage comes from the fact that the stain is translucent. As a result, you can change color, while retaining the natural variations in tone that give brick a natural look. In fact, instead of coating the brick with a single color, the stain actually mixes with the pre-existing colors within the surface to produce the outcome you want.

For example, to make a red brick orange, you do not cover it with an orange coating as you would with a paint or paint-like product. Instead, you add some yellow. Once the yellow is absorbed into the surface and dries, it blends with the pre-existing red color of the brick and creates a new, orange-colored brick.

Then there is placement. The stain specialist can choose the number or percentage of brick to change, what colors to use, and most important, which brick in which positions in the wall will be stained. Every element of the process is under control, which is why it can be so successful in mirroring every aspect of a wall.

Choosing a proven masonry stain system

When choosing a stain system, beware of those using latex or acrylics. They may start peeling, fading, cracking or blistering in only a few years, and are difficult to remove from brick and mortar when they need to be reapplied. Do not take a great product like brick and make it a maintenance nightmare, scarred with an unproven masonry system. As a rule, never put a product on a brick that can hurt a brick.

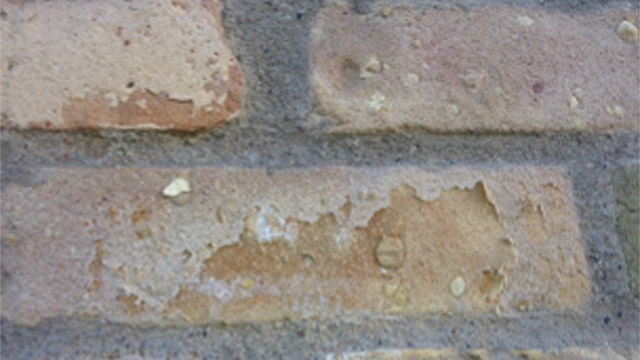
Just a few years after the application of a masonry stain that was not proven…
A proven masonry stain system:
  • Bonds and penetrates into the masonry surface
  • Never peels, cracks, fades or blisters
  • Is not an acrylic paint
  • Has been laboratory tested to weather 40-plus years, to not seal masonry, and to not fail in freeze/thaw cycles
  • Is translucent, allowing for natural color variations
  • Leaves no shine when wet or sunny
  • Is applied with a brush for maximum absorption
  • Comes with a resume of at least 10 jobs that have lasted 15 years or more in a severe weather market and that are available for public inspection.

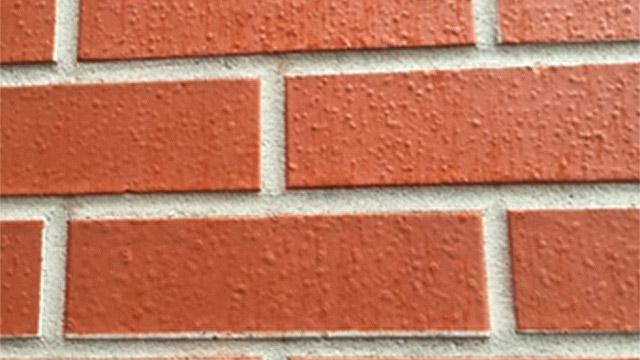
Here's a paint-like product applied less than two years earlier. Note the blisters formed in the coating, and the single-tone color. Even the mortar has a paint-like product on it. These are not proven masonry stains.

Working with your stain contractor

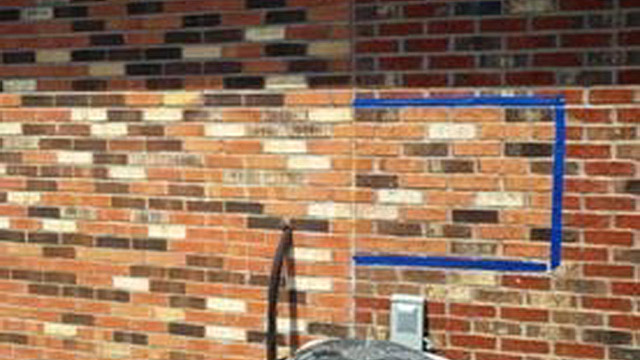
In a short few hours, your stain contractor’s specialists can represent their work on a 40- to 100-brick test panel. Whether it is taped-off portion of an existing fully cured wall or a temporary field panel built with mortar, the test panel displays the precise colors planned for the project and the way in which they are to be arranged. The customer and the architect can control the color range and other details, including the cost of the job. If the test panel shows that the mortar is not a good match, it can be stained as well.

In the blue-taped area is an example of how a staining sample can be represented or viewed for approval by the owner.
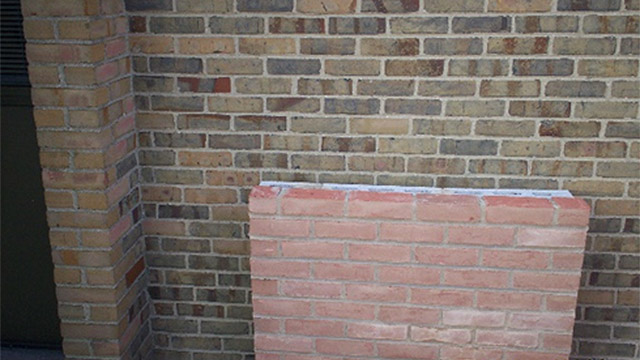
Once the test panel is approved, the stain contractor can easily expand the sample panel throughout the project for a successful completion.

Here is a donor brick that was chosen for its size and texture to be stained per the architect’s instructions.
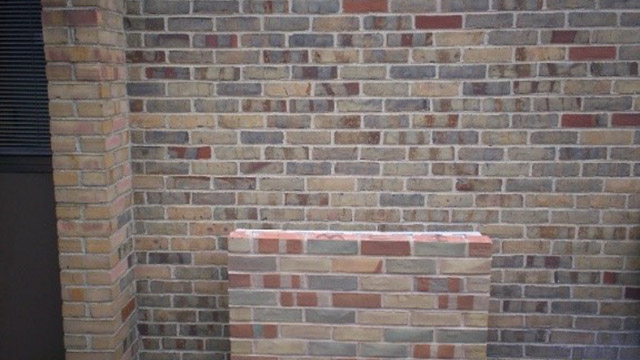
Here, the same test panel is in the process of being stained. This process is very flexible and allows for input from the owner and the architect.

Summary

To get a brick match, start planning early to find the brick or blend a combination of brick. If you cannot find brick that match, find brick that match in size and texture, and then get as close as you can in color. Then, use a proven masonry stain system to bring the color even closer. Satisfy your customers; simplify your life. Make it match, every time.
About: Featured

Copyright © 2023